Showing lots of options in Contact Form 7
Contact Form 7 is a widely used WordPress plugin that offers a fair amount of flexibility, but I needed for it to do something it didn’t want to do: I wanted to display a form with a lot of options and make it look good. Normally one would do this using radio buttons or a dropdown menu. Because scrolling through long dropdown menus is especially annoying, I opted for radio buttons. But then I wound up with a long blob of radio buttons I wanted something with some structure: columns and headings.
CSS to the rescue. The following is not perfect (there are some limitations on selectors that prevented me from getting as fancy as I wanted), but I consider it a big improvement.
First, use the “Generate tag” option to create a radio button. Set an ID for the radio-button set. In this example, it is recipientlist. Enable the “Wrap each item with <label> tag?” option. This CSS is dependent on the tagging that option produces. You could rewrite this to work the other way, but it’s friendlier to turn that on anyhow.
Second, create your list of options. You probably want to do this in a text editor, not the CF7 editing window. Organize your options into sections, and insert new lines with section headings where appropriate. Begin each section with the same word–in the example shown below, I’m using “Area”. If you’re using piped options, it doesn’t matter what comes after the pipe for these section headings. Paste your completed list into the “Choices” field
Third, gank the following CSS:
<style>#recipientlist {
display: block;
-webkit-columns: 3 150px;
-moz-columns: 3 150px;
columns: 3 200px;
}
#recipientlist .wpcf7-list-item {
display: block;
margin: .25em 0;
}
.wpcf7-list-item input[value^=Area] {
display: none;
}
.wpcf7-list-item input[value^=Area] + .wpcf7-list-item-label {
font-weight: bold;
}</style>
and paste that right into the CF7 “Form” field, right at the top. Change #recipientlist to whatever ID you are using for your button set. Change Area to whatever you are using as the lead-in text for your section headings. Do not introduce any extra line breaks into this, as WordPress will add tags that you don’t want. Do not try inserting this into your theme’s styles.css document or via other style-injecting mechanisms, as parts of this will get overridden and you will be sad.
Your radio-button tag should look something like this:
[radio recipient id:recipientlist use_label_element *lots of options follow*…]
Copy that code and paste it wherever you think it belongs in your form. The style element should be at the top though.
You may want to play around with the number and width of columns, depending on your theme and the content you’re presenting.
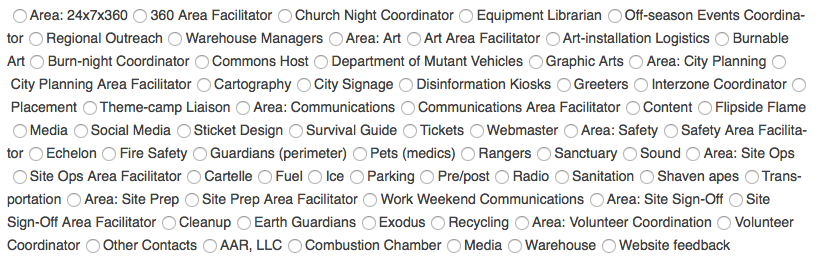
Here’s a before and after.
Before:
After:
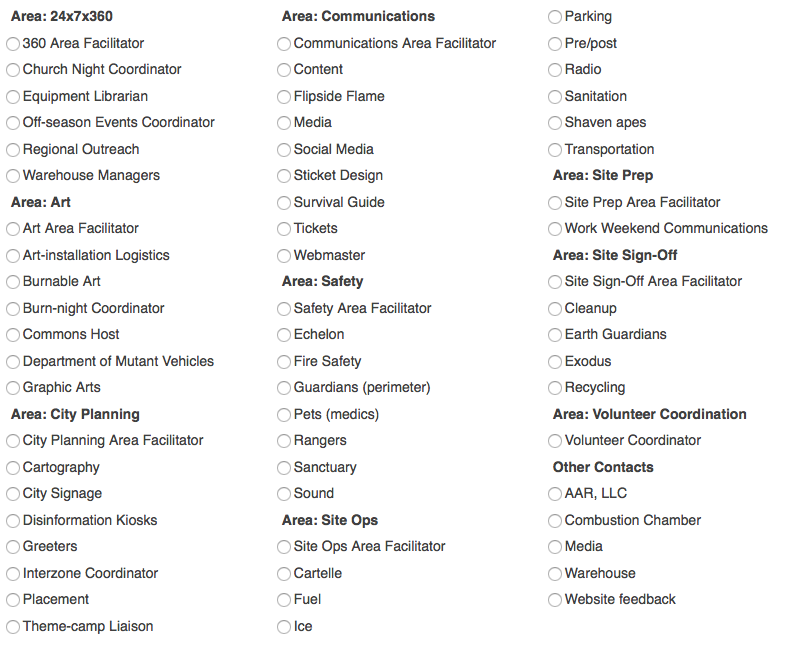
This isn’t perfect–there’s no way to control where the column breaks occur, or to show the sections as blocks of equal height. And it’s not semantically correct HTML. But it’s an improvement.
[Nerd mode=on]
There are four CSS rules here. The first one forces the set of buttons to show as a separate line, and breaks it into columns. The second forces each button to display on its own line. The third picks up buttons that begin with the section-identifying word “Area”; hiding the radio button and setting some margins. The fourth styles the label text for those section heading buttons.
[Nerd mode=off]