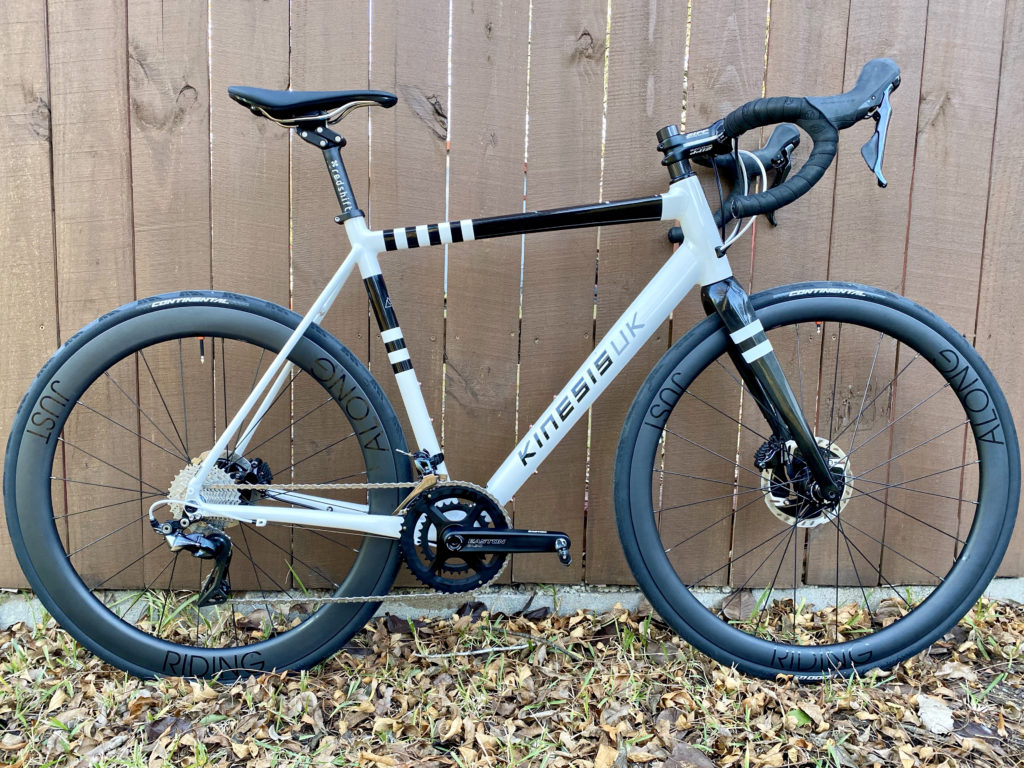
This is my new bike.
The setup
- Frame
- Kinesis RTD. This is a 55.5 cm frame, bigger than the 54 cm I would usually ride, which I chose at the suggestion of a fitter, who was concerned I wouldn’t be able to get enough stack on the smaller size. As I’ve got it set up now, I could probably lower the stem and still be comfortable.
- Wheels
- Just Riding Along “Mahi Mahi” rims (30 mm front/50 mm rear), SON Deluxe front hub, JRA house-brand rear hubs, Sapim X-ray bladed spokes. I felt like this would give me the best balance of aerodynamics and handling in crosswinds.
- Group
- mostly Dura Ace.
- Cranks
- Easton EA90. (Bottom bracket is also from Easton.) I got over my pride and decided to use 46/30 chainrings. For the amount of power that I can produce and my style of riding, I don’t need anything bigger (I sometimes see cyclists in bike forums asking about putting bigger chainrings on their bikes and I wonder “can you really push that gear?”). There aren’t a lot of road cranks that will take rings in those sizes (Shimano’s GRX have a wider chainline, which I could imagine causing shifting problems), which is why I went with Easton cranks. Although I don’t have a power meter on this bike now, Easton’s spindle-based power meter would be a relatively easy retrofit.
- Cassette
- Ultegra 11-30. Having small chainrings meant that I could put a relatively close-spaced cassette in back. This still gives a very low low gear, and a top gear that’s higher than the 52×13 that was typical when I started cycling. If I feel like I can pull it off, I’ll use an 11-28 instead.
- Seatpost
- Redshift; can toggle between a conventional position and a TT position on the fly. I got this used, along with a set of Redshift aero bars. After only one ride, I’m not convinced that it suits my purposes, but it is a well-made piece of equipment.
- Saddle
- Fabric Race Line Shallow, which seems to work for me.
- Stem
- Old stock from Zipp. Available cheaply; bought as a placeholder to confirm my positioning; I will probably replace it with a shock-absorbing stem from Redshift
- Bars
- Old stock from 3T, also available cheaply.
- Pedals
- Speedplays zeros. I would like to use SPDs, but they don’t offer a lot of float, and that has been causing me knee trouble lately, so at the last minute I made this change.
- Tires
- Continental GP5000 tubeless, 28 mm. I waffled on whether to go tubeless on this rig and ultimately decided that I would. I’d read horror stories about how hard road tubeless tires can be to mount and inflate, and about how tires that are the tiniest bit out of spec with the rims can blow off. In this case, I was able to mount the tires by hand with little trouble, and even inflate them with just my track pump, no air blaster required. Getting the valves set up took a little trial and error, and I misjudged the ideal length for the stems.
- Chain
- Wipperman Connex. Has a reputation for being especially durable, and the master link uses a clever design that does not require a tool to connect or disconnect.
Build notes
This is the first bike I assembled entirely myself. I had a shop face the brake mounts and bottom-bracket shell, and I bought prebuilt wheels, but the rest I did on my own.
The number of weird, specific bits and pieces I needed came as a surprise. I wound up getting a special socket driver for the bottom bracket and another one for the lockring that holds the chainrings to the cranks. I had bought the levers and brake calipers used, and had to buy barbed fittings and “olives” for the hoses (as it turns out, I should have bought new hoses as well). The rear caliper requires mounting bolts that are sized exactly to the frame, so I had to get those as well, and Shimano’s documentation on this is somewhat lacking, so that took a fair amount of research.
Apart from needing two new tools, getting the bottom bracket and cranks set up was a breeze. Although the preload adjuster didn’t stay locked in place.
Cutting the steerer tube was nerve-racking–do it wrong, and the fork is a total loss. Bleeding the brakes was especially nerve-racking. I’ve tried it before and gotten it wrong. I may still need to re-bleed the rear brake, because the bite-point seems a little late, but they both work.
Routing the cables and hoses was surprisingly fussy and involved a fair amount of trial and error. Although the result is OK, cosmetically it could be better. The frame routes the cables and rear-brake hose through the inside of the downtube, which was a slow and fussy task. I’m guessing that a Di2 setup would be considerably more fussy.
Using Shimano’s documentation to get the derailleurs set up was an exercise in frustration, and I really didn’t feel like I had it right until I took the bike around the block a few times and played with the barrel adjuster. I wound up ignoring Shimano’s documentation on bleeding brakes and went with Park Tools’ instead. As a Japanese translator and technical writer, I’m kind of disappointed with Shimano’s documentation–both the translation and the overall approach.
Ride notes
So far I’ve only gone on a couple of neighborhood shakedown rides and one real ride. I’m still getting my position dialed in.
On my one full-length ride I had the tires over-inflated and wound up letting some air out at the turnaround point; I could probably still let more air out. The frame is reputed to be especially smooth-riding, but I was feeling slightly beat up. I may change the seatpost for one with a little give (something my Felt VR30 has), or perhaps a suspended seatpost. I was buffeted by a stiff crosswind the whole way, which was a good test for those aero wheels (these the first aero wheels I’ve had). They definitely took a little extra wrangling, but not more than I expected. My average speed for the ride wound up being about 1 mph faster than I would have expected on the Felt I’ve mostly been riding lately.
Thank you for your blog posts. I really appreciate how well written they are and how concise you package the huge amounts of information.
I stumbled upon your blog in search for more insights on the mahi wheel set. It seems like you bought them for a similar purpose like I am considering to buy them for. That is because they are one of the few brands that offer dynamo hubs with carbon rims… and you really want a dynamo hub for longer bike packing trips. I am wondering if you checked out hunt and parcour wheels as well and how you ended up choosing the 30/50mm combination and 24 spokes.
Also, what surfaces are you riding this wheel set on/planning to ride it on. Only tarmac or also rougher surfaces? Any experiences so far?
My rides are probably 95% tarmac but especially while bikepacking (with extra weight) I sometimes find myself on rather brutal gravel.
I did indeed consider Hunt and Parcour and a couple of other options. The JRA wheels wound up seeming to be the best deal. As to spoke count—that’s what JRA offers. I’m not a heavy rider, so 24 spokes should be OK (knock wood). I’ll only be riding tarmac, although I did have some unintentional gravel riding on these when I followed a poorly researched route.
I chose the 30/50 setup with safety as the first priority and aerodynamics as the second. I know I’ll be spending a lot of time riding in crosswinds while fatigued, and I didn’t want the bike to be too hard to handle. So a 30-mm rim in front. I felt OK about handling the bike with a 50-mm rim in the back. So far, my time in crosswinds has made me feel this was a reasonable decision. It’s definitely harder to handle than low-profile rims, and I wouldn’t want it to be any harder. I’ve got about 600 miles on them so far.
Right now they also offer 28 spokes but only on 40/40 rims. I will have to consider my options here. Have been riding 24 spokes on my aluminium rims for 2.5 years now and I went down a lot of really sketchy paths with them. Don’t know how that translates to carbon rims though….
Good point about the fatigue factor when handling the bike in crosswinds. I really have to make up my mind on this but your approach sounds very reasonable.
Thanks for your input!