Monmouth OR
Stopping for pizza. Will probably stop for the night in Corvallis.
Stopped for lunch, first long stop of the day. It’s been rainy and cold all day. I was almost late fir the start and didn’t have time to get all my kit on, so I’m soaked and shivering. Not an auspicious start. I’ve been maintaining a decent speed and feel ok otherwise.
I mentally committed to riding TABR 2021 at the end of January 2020, and started training in earnest in March. I didn’t know what I was doing at first—I was still figuring out structured training, but by June, I had the rudiments of a training plan. I’ve been refining and tinkering with it since then.
That should have been plenty of time for me to get in shape for the TABR, but now I am 11 weeks away, and I feel like it wasn’t.
I can attribute part of this to some health issues (some related to my training, some not) that started cropping up in October and weren’t resolved until February. My fitness didn’t deteriorate during that time, but it didn’t improve either.
But part of it is simply being too complacent with my training plan. I could have pushed myself harder during the four months October—February. And I definitely could have started pushing myself harder immediately after that.
I saw a comment from a coach who has worked with at least a couple of successful TABR racers that one should get one’s cumulative training load up to 120 before the race. I don’t see a good way for me to do that right now.
There are a few concepts to understand here:
In any case, there’s no way for me to ramp up from where I’m at right now (CTL of 82 as of this writing) to a CTL of 120 without my TSB going deeply negative. In fact, there’s no way for me to ramp up my mileage to where I want it without spending some time in the TSB red zone.
My current training plan has me doing two 60(ish)-minute interval workouts, two 90-minute recovery rides, and a long weekend ride each week; I am using a mesocycle of three weeks, where I ramp up my long-ride distance by 10% for each cycle, and in the third week of each cycle, give myself an easy week with a relatively short weekend ride.
In order to build this plan, I’ve had to estimate the TSS for all my workouts. For the weekday workouts, this is a non-issue. I build the workout in Training Peaks and then I ride it on my stationary bike, so apart from the smart trainer having minor tracking issues, the result is nearly identical to the plan. There are no confounding factors like hills or weather. For the weekend road rides, I alternate hilly rides with flat rides; I worked out an average TSS/mile for both categories based on past rides, and use that when estimating the TSS of upcoming rides. I don’t have a power meter on my bike, so TSS for past rides is calculated based on heart rate (which I know is less accurate).
For my most recent weekend ride, this didn’t work. I had estimated a TSS of 355. Due to steep hills and strong headwinds, it turned out to be 465. It’s three days later and I barely feel recovered from it.
My current plan gets me up to a CTL of 105 before the event, and that is after a recent retooling to give me a more aggressive ramp rate. But now I’m wondering if even that is too aggressive. Especially since I’ll intentionally be hitting TSSs of 465 on some of my weekend rides as I ramp up, and I know how much that took out of me. I am worried that I’ll be both overtrained in terms of my health and undertrained for the event.
With my current training plan, I am cramming most of my TSS ramp-up into my weekend ride. In theory, I could change my training plan so that instead of comparatively light weekday rides and a very heavy weekend ride, I would ride at more consistent TSS levels throughout the week. This would avoid blowing myself out on one weekend ride, but would be harder to fit into weekdays, and in any case, I feel like I need to have the experience of long, uninterrupted hours in the saddle to prepare.

When I was a kid, my father told me about a friend of his, Rudy, who had ridden his bike coast-to-coast. I think this planted a seed.
In the late 90s, I decided to do my own cross-country ride, and resolved to ride the Southern Tier. I was preparing for that in a desultory way, but my life kind of turned upside down in 2000, and I forgot about that goal. At the very beginning of 2010, something reminded me of it and I realized that I still wanted to do it. I mentioned this to Gwen, who gave me a look and said “you’re not getting any younger.” That was all I needed to hear. I started preparing immediately, and in September 2010, I did it.
Although riding the Southern Tier wasn’t exactly easy, it also wasn’t quite the challenge that I was looking for. For some time, I’ve wanted to do another cross-country ride, but one that would be more of a test. I had the idea of doing this in 2020, ten years after the first one. I’d heard of the Transcontinental Race before, and it fascinated me, but the logistics would be so daunting that it just seemed off-limits. In January of 2020, I learned of the existence of the Trans Am Bike Race and I knew instantly that I would do it. This was before the pandemic reached the USA, but I felt that my commitments to Flipside would make it unrealistic to attempt it in 2020, so I set 2021 as my goal. Of course, then the pandemic struck and everything was cancelled. But I was still able to start preparing for the TABR, and I did. This has been the thing that organized my time during a period when time has gotten fuzzy.
The race starts June 6. The course is 4200 miles, give or take. I’m aiming to complete it in 20 days. Registration has opened for it and I’ve signed up.
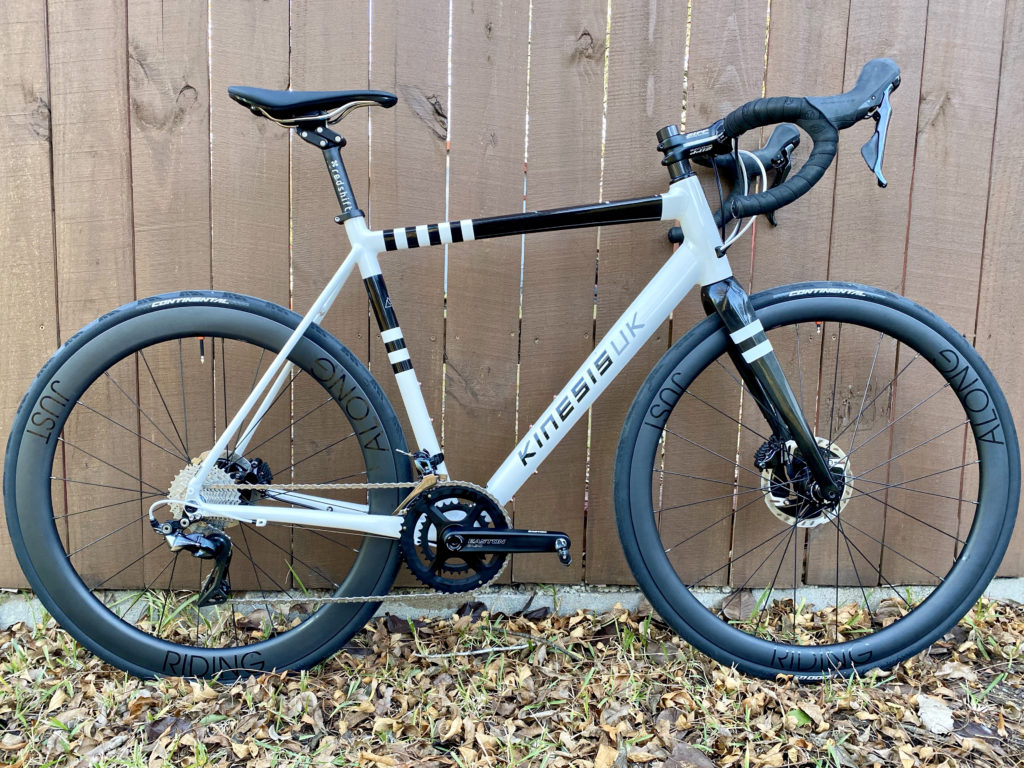
This is my new bike.
This is the first bike I assembled entirely myself. I had a shop face the brake mounts and bottom-bracket shell, and I bought prebuilt wheels, but the rest I did on my own.
The number of weird, specific bits and pieces I needed came as a surprise. I wound up getting a special socket driver for the bottom bracket and another one for the lockring that holds the chainrings to the cranks. I had bought the levers and brake calipers used, and had to buy barbed fittings and “olives” for the hoses (as it turns out, I should have bought new hoses as well). The rear caliper requires mounting bolts that are sized exactly to the frame, so I had to get those as well, and Shimano’s documentation on this is somewhat lacking, so that took a fair amount of research.
Apart from needing two new tools, getting the bottom bracket and cranks set up was a breeze. Although the preload adjuster didn’t stay locked in place.
Cutting the steerer tube was nerve-racking–do it wrong, and the fork is a total loss. Bleeding the brakes was especially nerve-racking. I’ve tried it before and gotten it wrong. I may still need to re-bleed the rear brake, because the bite-point seems a little late, but they both work.
Routing the cables and hoses was surprisingly fussy and involved a fair amount of trial and error. Although the result is OK, cosmetically it could be better. The frame routes the cables and rear-brake hose through the inside of the downtube, which was a slow and fussy task. I’m guessing that a Di2 setup would be considerably more fussy.
Using Shimano’s documentation to get the derailleurs set up was an exercise in frustration, and I really didn’t feel like I had it right until I took the bike around the block a few times and played with the barrel adjuster. I wound up ignoring Shimano’s documentation on bleeding brakes and went with Park Tools’ instead. As a Japanese translator and technical writer, I’m kind of disappointed with Shimano’s documentation–both the translation and the overall approach.
So far I’ve only gone on a couple of neighborhood shakedown rides and one real ride. I’m still getting my position dialed in.
On my one full-length ride I had the tires over-inflated and wound up letting some air out at the turnaround point; I could probably still let more air out. The frame is reputed to be especially smooth-riding, but I was feeling slightly beat up. I may change the seatpost for one with a little give (something my Felt VR30 has), or perhaps a suspended seatpost. I was buffeted by a stiff crosswind the whole way, which was a good test for those aero wheels (these the first aero wheels I’ve had). They definitely took a little extra wrangling, but not more than I expected. My average speed for the ride wound up being about 1 mph faster than I would have expected on the Felt I’ve mostly been riding lately.
[sgpx gpx=”/content/gpx/Cycle-20201205-0958-70615.gpx”]
Ride Time: 4:53:17
Stopped Time: 27:16
Distance: 75.08 miles
Average: 15.36 mph
I went for a ride yesterday that I can only describe as a bad ride. It was cold and rainy. When I rolled out, I thought I’d be warm enough. I wasn’t. My left knee starting bothering me after about 20 miles. I had planned on riding 85 miles, but got discouraged and turned around early, so I only put in 75.
But you don’t learn anything from a ride that goes perfectly. When things go wrong, you can learn a lot. So what did I learn?
Because my right leg was doing most of the work, I couldn’t ride as hard, so I couldn’t generate as much body heat as usual, so my kit—which might have been warm enough if I were riding harder—wasn’t warm enough. Normally my average heart rate on a ride like this would end up around 125 bpm, and be higher at the end than the beginning; on this ride it was around 123 bpm early in the ride, and by the time the ride ended, it was down to 119 bpm. It’s possible that I wouldn’t have been warm enough anyhow: I’ve worn exactly the same kit to commute to work in the same conditions, but my commute is only about 30 minutes each way, not a continuous five-hour slog. I’m not sure whether to chalk up the difference to riding faster on the commute, or just an ability to tough out the cold for a short period.
I suspect my knee was jacked up because of a combination of the cold tightening my muscles, and my pedals not giving me as much float as I’d like. My natural tendency is to ride in a very toes-out stance. I always used to ride on Bebop pedals, which had 20° free float. Conceptually, they’re a lot like Speedplay pedals, except they are more robust and the cleats fit regular 2-bolt drilling.
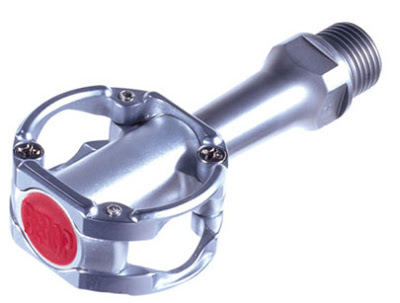
Bebop pedals were produced by what I think was a one-man company. Eventually he sold the works to a big Taiwanese company that continued manufacturing them for a few years, but ceased production in 2017. I’ve still got a set, but the cleats are worn out. I’ve got a watchlist set on eBay for these: in four months, I’ve seen two NOS sets listed; in both cases for ridiculous prices, and in both cases they’re snatched up immediately. If there were a Kickstarter to put them back into production, I’d subscribe.
Rather than switching to Speedplay pedals, I’ve been using SPDs. But SPDs only have 4–5° float, and I can’t position them to accommodate my weird stance on the bike. In the warm months, this hasn’t been a problem, but my past two chilly rides have been hard on my left knee, and I’m pretty sure this is why.
So what I’ve learned is that I’ve got to bite the bullet, get warmer cold-weather gear, and get pedals with more float.
I recently got an Apple Watch 6. I had been using a Fitbit Surge for about four years, so my impressions will be colored by that background.
Apple’s packaging is amazing. Everything is sleek and snug. There’s almost no cellophane, no twist-ties, and almost no plastic. The cardstock is smooth and perfectly printed. The shipping box used cardboard spacers instead of peanuts or airbags. One gets the impression that Apple has a packaging-design lab that is better funded than NASA.
Compared to my old Fitbit—which is chunky even as fitness trackers go—the Apple watch is much less obtrusive, more comfortable. I can pretty much forget that I’m wearing it. It sits flatter on my wrist, and the rounded edges seem less prone to catching on things. I got the 44-mm (larger) version. My wrist isn’t that big, but I think it looks right and feels fine.
This is a matter of perspective. The Surge, when it was new, could get about five days of battery life if you didn’t use the GPS. If you did use the GPS, you only got about 7 hours. By the time I gave up on it, though, battery life was barely one day. Apple touts 18-hour battery life for its watch, which would suggest that at its best, it’s no better than my Surge was after years of use (setting aside the fact that Apple’s watch has much more ambitious hardware). In fact, I’ve found that battery life can be much better. I wore the Apple watch for 48 hours continuously, and tracked one 60-minute workout (which drains the battery more quickly, as it runs the heart-rate monitor more, and depending on what you’re doing, also runs the GPS) during that time, and by the end of this, the battery still had 16% charge. I think the reason got this result is because I’ve set the screen so that it is off when I’m not looking at it: the big feature with the previous version of this watch was an always-on display, although the screen was simplified and updated much less frequently when you weren’t actively using it. This is the default mode, and I’m sure Apple’s battery tests are based on this default. So far, I don’t mind waking up the screen.
I need to give Fitbit some credit here—it would automatically recognize that you were working out and would track that automatically. It would attempt to classify your workout based on some characteristic movements, and it wouldn’t always get it right—it would recognize yardwork as exercise, but didn’t have a category for that, and would always classify it as something weird. It did let me reclassify these. The Apple watch only counts exercise when you fire up the “Workout” app and tell it what activity you’re doing. So it’s not possible to “close your rings” passively through normal activities; there’s the additional cognitive load of starting and stopping a workout. Edit: the watch does notice when I’m going for a walk (for example) and prompts me to confirm that yes, I’m going for a walk. When I do this, it doesn’t “backdate” to the point when I really started walking. It also notices when I’ve stopped walking, and prompts me to either pause or end the activity. So it’s not doing everything in the background—it does still require intervention—but it is trying to be helpful.
Also, I’ve found that Apple’s estimates of calories burned are very low. I’ve got a smart stationary trainer that measures my power output; this is the gold standard for estimating work performed. Work is simply power × time, and due to a mathematical quirk, calories burned are very close to work performed. I’ve found that Apple’s estimates of calories burned during a stationary-bike workout are about 2/3rds my work performed (although Gwen’s experience is different from mine). Its “active calories” figure is even lower. “Active calories” is apparently Apple’s term for total calories burned minus basal metabolic rate, although my BMR is about 67 kCal/hr, but Apple seems to be calculating it as about 80. So I don’t know what’s going on there.
I also work out with a chest-band heart rate monitor. Apple’s watch seems to lag the chest band by a couple of seconds, but that doesn’t concern me.
The screen is really beautiful, but I have to admit that I can’t fully appreciate it. My eyes are 54 years old, and I’m close to needing reading glasses. I’ve got the type size maxed out; the watch faces seem to use two sizes of text–small and smaller. I can make out the small text; the smaller text I really need to concentrate on, which misses the point of a gadget you can glance at quickly.
Apple gives you a huge number of basic watch-face designs, many with variations, most of which you can customize with complications. I think the most elaborate design allows for 8 complications in addition to the watch face itself. As clever as that seems in the abstract, I find that I am unable to take it all in, or even focus on the one piece of information that I’m interested in (possibly if my eyes were sharper, I could). Four complications seems to be about right.
Text display for notifications seems OK. Clear enough for me to read, although I’m not going to read a book on my wrist.
The hardware is really nice. I covered some of that in Comfort above. I’ve got the woven nylon band, nothing special, and it’s completely unobtrusive.
I’m a little mystified by the two hardware controls: there’s a button and a crown (which also acts as a button). Pressing the button brings up a list of recently used apps; pressing the crown brings up the app browser (either as the impenetrable “grid” or as an alphabetical list) if you’re on the watch face, or surfaces you one level (either to the watch face or up in a menu system) if you’re anywhere else. I’m not convinced both modes are worth having; there’s also a “dock” of favorite apps that you access by swiping up from the bottom. The crown also acts as a scroll wheel; there have been a few times where the crown was the only way to manipulate something that I thought I could manipulate using the touchscreen, which confused me at first.
I haven’t figured out how to hide the Cycle Tracking app. I’m not going to need that for myself, and tracking someone else’s cycle would just be creepy.
Everyone who has eaten pizza is familiar with the wedge cut and tavern cut (aka party cut). But those aren’t the only ways to slice a pizza. For a variety of reasons, the following cuts have never caught on.
Laborious and extremely difficult to do correctly, this is currently only available from Monello’s in Fort Lee NJ when Sal is on shift. Even allowing for its novelty, it is not very popular, because all the crust winds up at one end. Rumor has it that Sal once attempted a double spiral and spent a week in a treatment center as a result.
Another laborious cut. The value of this pattern is questionable since no one has ever wanted to assemble a pizza from pieces.
A project begun by Original Ray’s Famous Center for Advanced Studies in Brooklyn, this is an ongoing project to slice a pizza in which each slice is half the width of the previous slice. Begun in 1998, the project is currently raising the funds needed to split a neutron into its component quarks.
A shameless attempt at one-upsmanship by Ray’s Famous and Original Research Institute also in Brooklyn, this was an effort at slicing a pizza into a Sierpinski gasket. The project was begun in 1999 and abandoned in 2003 due to the exponentiating slice length.
A pattern developed by a family of bickering geniuses in Beloit WI to ensure that each slice contained exactly one complete piece of pepperoni, it has found no traction in the wider world.
First attempted not at a pizzeria but at a silicon-ingot foundry, this cut slices through the thickness of the pizza rather than across its diameter. Has found increasing popularity with the growth in gluten-free and low-carb diets.
I started getting interested in bikes when I was 13. My interest has waxed and waned over the years, but never really went away. I’ve thought of myself as a cyclist since I got my first pair of cleats at 17. I’ve always been interested in bikes as objects of technology and craftsmanship, and I’ve always enjoyed riding them. At various points I’ve gotten to be a pretty strong rider, but I’ve never been methodical about it—beyond following Eddy Merckx’s advice to ride lots, and perhaps alternating long days with short days, I’ve never been interested in structured training. Lately I have gotten interested, and like so many things, once you pry the lid open on a subject, you discover it goes much deeper than you ever imagined.
I’ve been trying to digest a lot of the concepts involved in structured training, but I haven’t found any one place that packages them up so far. There is a book (and a paper that preceded it) that, well, “wrote the book” on a lot of this, and I may eventually break down and get it. For now, this is my own cheatsheet. Some of this may be wrong. I’m not going to link back to citations for everything. Caveat lector.
I almost never use bookmarks in my browser. I can get to the sites that I visit regularly by typing a few letters into the URL field of my browser. For the most part, if a site interests me and I might want to come back to it in the future, I add it to my RSS reader. And that means that there are some sites lurking in my list of feeds that haven’t been updated in years, but are still out there. And they’re still pretty cool, so I thought I would share them.
Most of these are visual, and are easy to dip in and out of; a few require some commitment.