Introduction to staff making
Following is my recipe for making a wooden staff. Nothing fancy–this design does not separate into parts for travel–but it has a good feel to it.
To do a good job making a staff takes a little more forethought and patience than many other fire tools, but the extra time invested up front will make each following step easier, and result in a well-balanced, solid staff.
Click on the images below to pop up bigger versions.

Tools
Left to right
- Ruler
- Scissors
- Pens
- Masking tape (yes, it’s blue)
- Heat-resistant thread-locker
- Big sheetmetal screw (fits 1/4″ hole)
- Big machine screw (10-24 thread, as long as possible)
- Scoring tool
- Big phillips-head screwdriver
- Tile nipper
- Sheetmetal cutter
Not shown: white glue, rubber bands, drill press

Materials
- Dowel
- Use a good hardwood for this. I use ash. Oak or hickory would also be good choices. But pine or other soft woods will not hold up. Long dowels for staffs can be hard to find–I get mine in quantity from Atlas Dowel. Select one that is clear of knots and defects. A 1″ diameter will suit most people; a 0.75″ diameter is good for smaller hands or double-staffs. Length is entirely a personal matter, and you should experiment with a broomstick or something before you start making your staff.
- Wicking
- The amount you use is entirely up to you, but will greatly affect how the staff feels when you are spinning it. I usually recommend one band at each end made from 3″ x 24″ strips, but you could use more or less.
- Copper foil
- Necessary to fireproof the ends. Usually available at a good hardware, craft, or hobby shop.
- Screws
- 10-24 thread, length will depend on the dowel diameter and amount of wicking, but should be about 1.5″
- Screw posts
- Also occasionally called Chicago screws or sex screws [don’t even start]. Use these instead of bolts. These are cylinders threaded on the inside; they mate with the screw in the middle, and have a low-profile screwdriver-style top. Must fit the screws. Outer diameter should be .25″. Available at a good hardware store.
- Washers
- Must fit over the screws and screw posts, to spread their compressive load over the wicking. Shouldn’t be too big.
- “Rabbit-ear” hose clamps
- These are continuous stainless-steel bands that get crimped in place, unlike most hose clamps that screw in place. (for a 1″ staff, get “double-pinch” clamps with a max. dia. of 27 mm–these are available from McMaster-Carr
Prepare dowel
Sand the dowel smooth and apply a couple coats of finish to it. I use a tung-oil finish. Let the finish dry completely before proceeding.

Mark guidelines on shaft
In this step, you are making alignment marks that will guide almost every step that follows. Hold the dowel in the groove of a door jamb, and draw lines at least 8″ long at each end.

Mark guidelines on copper
Using a ruler and a sharpie marker, mark cut-lines on the copper foil, and then score these with the scoring tool.
You are going to cut a total of four pieces: two pieces that are 6″ x 1.5″ (or half again as wide as the dowel, whatever its diameter), and two pieces that are 6″ x 6″. If you are going to put multiple bands of wicking on each end, you’ll need to make these 6″ x 12″ or something bigger.
Measure and mark wicking
See my section on making wicks for tips on measuring and marking the wicking.

Cut copper
Once you’ve got the copper foil scored, cut it with sheetmetal cutters.

Behold, the cut copper pieces
Your copper foil pieces should look something like this.

Pre-position the hose clamps
Because it’ll be difficult or impossible to do later, slide the hose clamps onto the middle of the dowel and tape them in place.

Apply the butt cladding
You always wanted to clad your butt, didn’t you.
In this case, you are fireproofing the butt ends of the staff. Take one of the narrow pieces of copper foil and center the end of the dowel on it. Fold the copper up along the sides of the dowel and tape them in place.

Finish off the butt cladding
Carefully fold, bend, and crimp the bits of foil sticking out so that they lie flat against the shaft. You can roll the dowel on a hard surface to make these bits lie smooth against the dowel.

Apply the side cladding
Take one of the larger pieces of foil and put a piece of masking tape along one edge. Line that edge up with the guideline you drew on the dowel before, and wrap the foil as snugly as possible around the shaft.
For best results, you should roll on the foil in the same direction at each end. This takes a little extra thinking–the natural tendency is to roll on one end, flip the shaft around, and roll on the other end the same way. This results in the foil rolling on in opposite directions, which isn’t the end of the world, but makes it a little harder to keep everything straight.
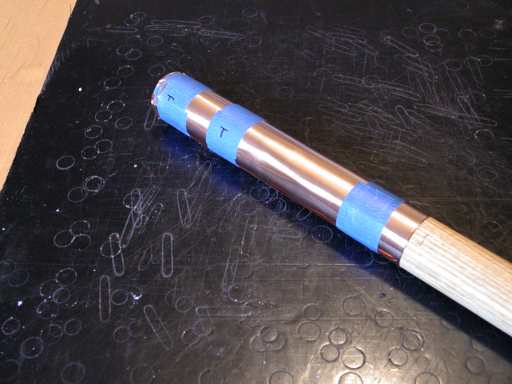
Finish side cladding
Wrap a few bands of masking tape around the foil to hold it in place. One band should be about .5″ from the inner edge; the others will be roughly where you will be drilling later.
Figure out exactly where you plan on drilling the dowel, and make appropriate marks. The holes should be in line with the guideline on the dowel. When using 3″ wicking, I have one hole placed 0.5″ from the end, and another placed 2″ from the end. Having two screws hold the wicking on is optional, but it does provide a measure of security in case one screw falls out or breaks.
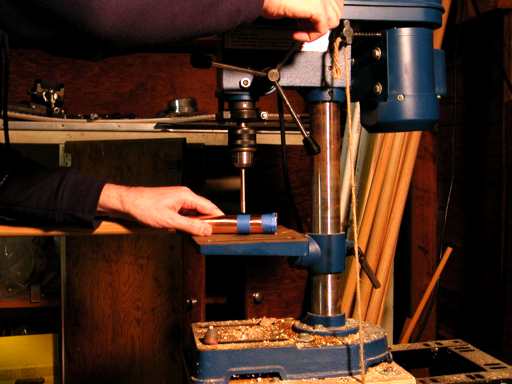
Drill the dowel
Holding the dowel level (prop it up on something if necessary), use a .25″ bit to carefully drill straight through the points you marked in the last step.
A drill press is really handy here, but this can be done with a handheld drill and a vice, or a friend’s set of hands.

Finish out the holes
There may be sharp bits of copper flashing after you drill. I strongly recommend finishing out the holes with a pointy grinding bit. This helps flare out the openings a little, making it easier to get the screw posts in place.
Make sure that you can slide a screw post into each hole, from both sides, without forcing it. If necessary, use a file to clean out the holes.
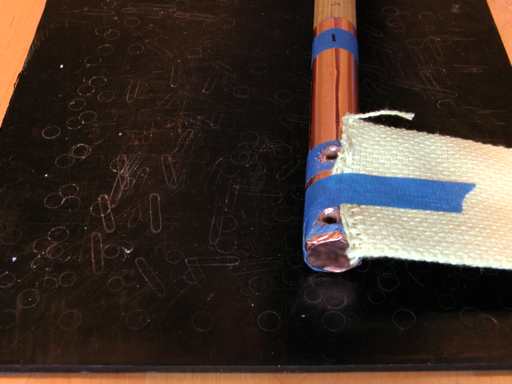
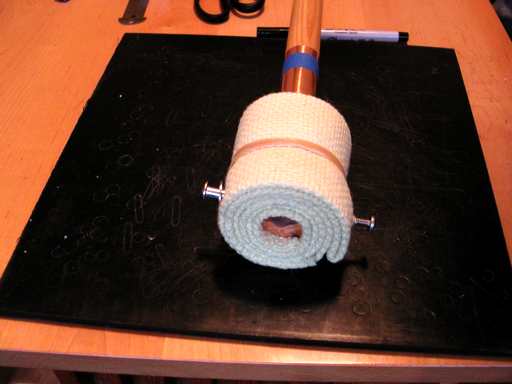
Apply wicking
Line up the wicking just under the holes and tape it down. Wrap it on as tightly as possible, and tuck under the cut end so that the folded end stops a little ways past the guideline on the dowel. Tape and rubber-band the wrapped wicking in place. Like the foil, the wicking should roll on the same way at each end.
I let the wicking overhang the end of the dowel by .25″, so that it can act as a bit of a bumper when the staff is dropped.

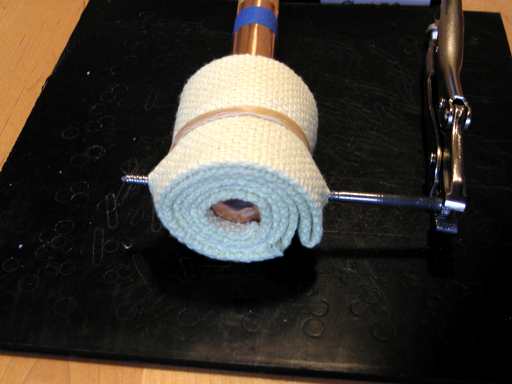
Wicking rolled on
Once the wicking is on, it should look something like this
Drill pilot holes
Now for the fun part.
Take your big sheetmetal screw and figure out exactly where the holes you drilled should be. You should be able to sight off your guideline and work it out without too much difficulty. Then drive it all the way through the wicking, through the hole in the dowel, and out the other side. Yes, this is a pain, and you might miss the hole, but keep at it. You may find it helpful to use an awl to run through the kevlar and make sure you’re properly lined up with the hole before you drive the screw in.

Open up the pilot hole
Back out the sheetmetal screw and follow it with a screwdriver, which should be a very snug fit with the holes. Work this energetically back and forth to force open the pilot hole a little more.
Guide the screw post in
Remove the screwdriver and insert your super-long machine screw–this should be long enough to poke out the opposite side. Slip a washer on the screw post, and then thread the screw post onto the screw.
Work the screw post into the wicking with your screwdriver until the tip of the screw post is in the dowel’s hole. Using the long machine screw may seem like an extra step, but it makes it much easier and safer to work the screw post in. If the screw-post isn’t making it into the hole in the dowel without forcing, either it is caught on some kevlar fiber or the hole is obstructed. Remove the screw post and try to clear the path for it. I’ve injured myself twice when my screwdriver slipped trying to force in the screw-post—learn from my mistake.
If everything has gone according to plan, you can now remove the long screw. Slip a washer on a regular-length screw, and thread that onto the screw post. Screw it down as tightly as possible. I also put a dab of heat-resistant thread-locker on the tip of the screw to help secure it.

Compress clamps
Slip the hose clamps onto the copper foil so that their inner edges line up. Clamp down on the rabbit ears as hard as possible with your tile nippers.
A bead of JB Weld might be a good idea here.
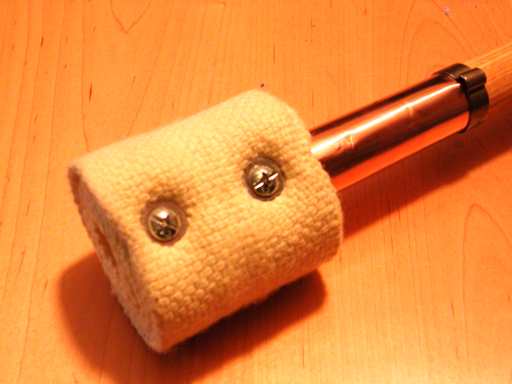

Done!
The finished ends should look something like this (both the screw-side and screw-post-side shown here)