Introduction to wand-making
Finger wands have been through more design revisions than anything else I make. Following is the first recipe that really seems to be satisfactory. It can readily be adapted to full gauntlets instead of individual fingers by substituting sturdy leather gloves for the finger guards.
Click on images to pop up bigger versions.
Tools
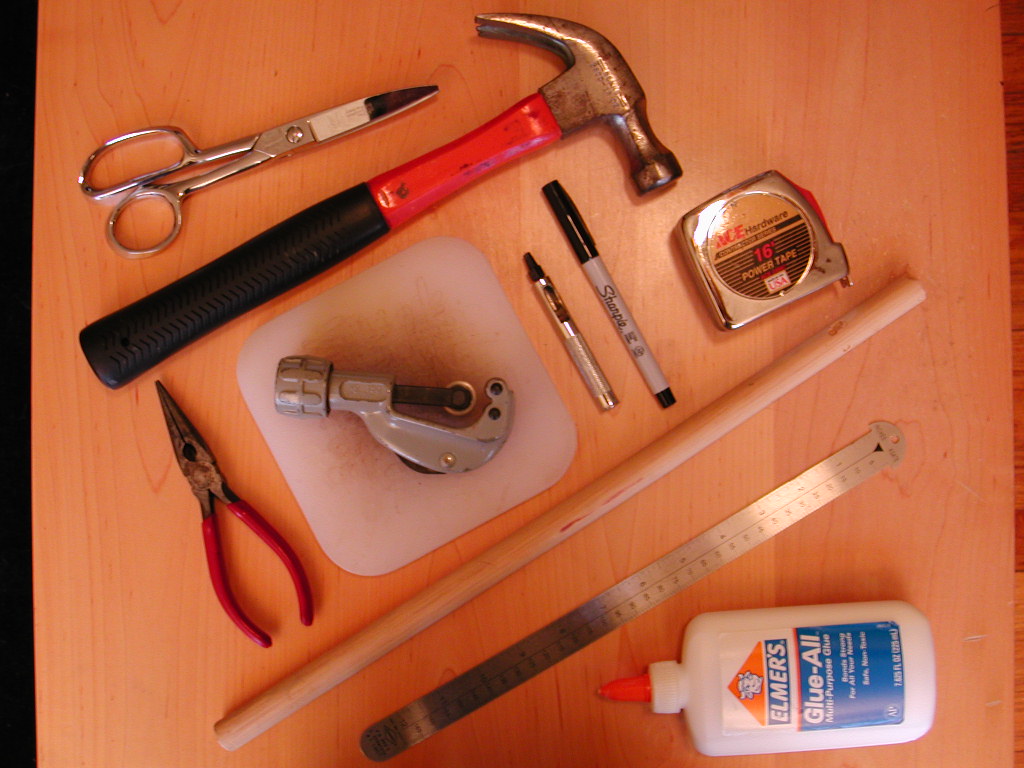
Shown here are (almost) all the tools used to make finger wands:
- scissors
- hammer
- combination pliers/wirecutters
- rotary tubing cutter
- cutting board (used for leather punching)
- leather punch
- fine-point Sharpie marker
- tape measure
- wooden dowel (about 3/4″ diameter)
- ruler
- white glue
Not pictured: leatherworking needle, drill press
Materials

Shown here are the materials needed to make wands:
- Brass tubes. These are 3/16″ diameter and 12″ long. The same tubes can often be found in 36″ lengths, which is less wasteful.
- Wicking. For finger wands, I use wicking that is 1″ wide and 1/16″ thick, usually in lengths of about 12″
- Light-gauge wire. Not important what exact gauge or metal you use for this. This is used to anchor the kevlar to the tube; you can substitute some unravelled kevlar thread for this, which is a good idea if you plan to use the wands for fire-eating.
- Leatherworking thread. This is very heavy thread, used here to anchor the tube to the finger guard.
- Finger guards. These are somewhat hard to come by–I get mine from McMaster Carr. You can also use whole gloves–I recommend using reasonably sturdy leather gloves.
Step 1: Mark wicking
See my section on making wicks for tips on marking wicking
Step 2: Mark tubes
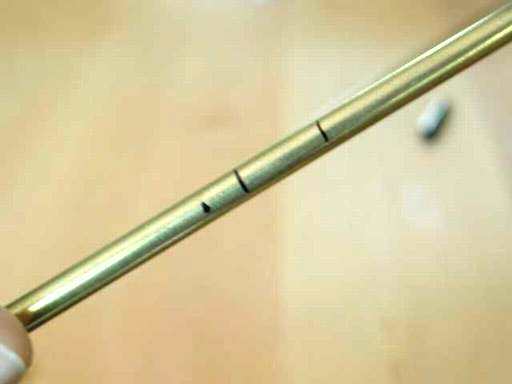
Using your marker and ruler, put clear markings at the cutoff points along the brass tubes. Your target length for the tube should be the length you want it to extend beyond your fingertip plus about 2″/5 cm. Once you have done this, make one mark about .25″ from one end of the section, and another mark about .5″ from the other end of the section. These show where you will be drilling. In the picture here, you see three marks together showing a cut line between two tubes, the 0.5″ drill-mark at the top of one section, and the 0.25″ drill-mark at the bottom of the next section.
Step 3: Cut tubes

Using your rotary tubing cutter, cut the tubes. You could use a hacksaw in a pinch here, but the tubing cutter leaves clean ends and is easier in general.
Step 4: Drill tubes

If you don’t have a drill press, this is going to be extremely difficult (I’ve tried). A handheld drill is just too squirrelly on a tube like this. I use a 3/32″ drill bit. Brass is a soft metal, and shouldn’t give you much trouble even with the drill set to a high speed. Remember to drill both ends of the tubes!
Step 5: Grind tube

After drilling, you’ll probably have some sharp brass flashing you need to get rid of. Put a stone grinding bit in the drill press (or use your bench grinder) and clean it off. Remember to clean both ends, and depending on the condition of the tube ends, you might want to grind them a little as well.
The tube, drilled and cleaned
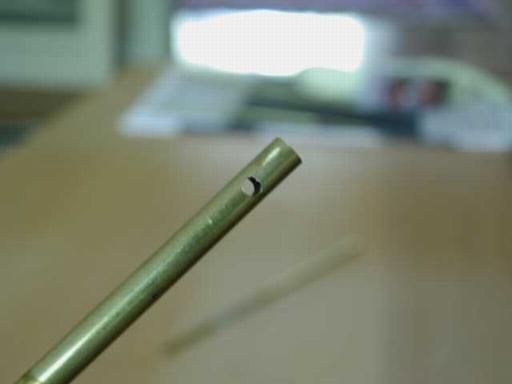
The end of your tube should look something like this once you’ve prepped it.
Step 6: Mark finger guard

Put on a finger guard (or your gloves) and make two marks: one should be close to the fingertip, and the other should be slightly above your second finger joint
Step 7: Punch finger guards

Slip the finger guard (or glove finger) over your wooden dowel. Lay this on a solid surface, and stabilize it (sitting on it works well). Carefully punch out both the spots you marked: you should be punching right into the dowel
Step 8: Apply the wicking

This step is a little tricky. Cut a length of wire about 5″/12cm and slip it into the hole on your tube that is .5″ from the end. The tip of the wire should be barely poking through. Take a strip of wicking, and lay it over the wire tip so that there is just enough there to be caught by the wire tip. Hold it there and push the wire almost all the way through, so the tip is just showing on the opposite side of the tube. Wrap the wicking so it catches that, push the wire through, and repeat. Note: If you prefer Kevlar thread to wire for binding the wicking, you will follow a similar procedure, but instead of the wire here, use a large, unthreaded needle. You’ll push it back and forth the same as you would the wire in the example above, and once the entire roll is on the needle, then thread the needle.
Step 9: Apply the wicking (continued)

Repeat the back-and-forth routine until most of the roll is on. When you get near the end, fold the cut end of the wicking underneath so that it is hidden on the last wire pass-through.
Step 10: Bind the wicking

Center the tube on the wire, and pinch the wire together right over the end of the wicking roll. Use your pliers to twist the wire several times (not too tightly or you’ll break the wire) close to the roll. Use the wirecutter to nip off all but about .5″ of the twisted wire, and then bend this tail so that it is tucked underneath the end of the roll. Note: If you prefer Kevlar thread to wire for binding the wicking, once you have threaded the needle, just pull it out of the roll so that the roll is now on the kevlar thread. Wind the kevlar thread a couple times around the roll and tie it off securely. Cut off the excess thread, and dab some white glue on the knot.
Step 11: Attach the wand

Take the end of the brass tube and slip it through the holes in your finger guard. The hole .25″ from the tube’s end should be just sticking out of the lower hole. Using very stout thread and a big needle, stitch this into surrounding leather using a few whip-stitches. Leave a couple inches of thread loose at your starting end, and when you finish stitching, tie the ends together and cut off the excess thread. Done!
OMG thank you sooooooooo much i’ve been looking for a guide to make these all week and every other site came up short!!! thanks so much i can’t wait to try it.
Adam,
Thank you so much for the thoughfulness of posting not open to the poi group but posting your web site with instructions on how to create the Poi stick etc.
You are awesome!!